Verve's day one project parade challenge was to create an egg-stra special Easter project or card. You can play along here. The winner gets $25 in Verve bucks!!!! I made this card and finally got a minute to post tonight. I didn't use eggs, as I don't have any Easter stamps, so I just made the card an Easter one.... Maybe I'll get some Easter stamps if I win.... I've had my eye on the Bunny Bundle!! It would be perfect for getting started on the new baby's album too!!!! That's right... I said new baby! We found out last night that Bug is going to be a big sister!!!
Tuesday, March 31, 2009
Easter card for Verve's egg-stra special Easter challenge!
Posted by nap time stamper at 10:35 PM 2 comments
Friday, March 27, 2009
Congrats Laura!!
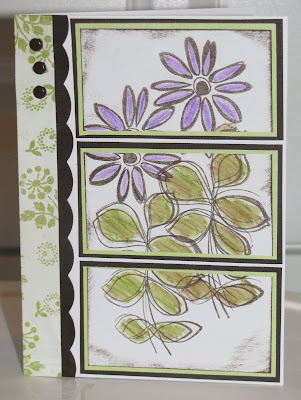
Laura at Scrapnextrass - I'm a huge fan - is celebrating 300,000 hits! I can't even imagine 300,000 hits.... maybe if I hit the "view blog" button enough times after I make a new post, then I'll get there. Just kidding! Laura has incredible talent... her cards are absolutely beautiful, and I'm sure she will be celebrating 400,000 very soon. To celebrate she has challenged readers to CASE any card in her gallery. I have spent hours on numerous occasions just browsing around and there are so many that I want to try, but when I saw this card yesterday, I had to use it. I have this set of botanical stamps by Scrappy Cat that I haven't found a good use for, so I actually tried to copy Laura's stamped image using my botanicals and a flower stamp by Rhonna Farrer. Here's what I came up with.
Part of the challenge was to change at least three things, so mine were
* No sentiment
* No ribbon/rose - brads instead
* Color scheme - i used green, brown and a touch of purple
The picture looks blurry, but it's not... the card looks blurry in person too. I stamped the image and colored it three times before I tried this one. Since I'm still new to these water colors, and I need a tutorial on staying in the lines, I decided to go with the distressed look. I stamped the image three times each, moving it slightly each time, and then colored in the leaves with a light green, dark green and brown, not paying attention to any particular line. I layered these colors lightly and then used the water pen to blend them. I liked the way this turned out much better than my attempts at straight lines. :) Enjoy! And be sure to check out Laura's card if you haven't already!
Posted by nap time stamper at 11:00 PM 1 comments
Thursday, March 26, 2009
Card sets galore!
I've been getting to play in my stamps these past few days and I'm starting to feel like me again! It feels like so long since I've been able to stamp or scrap, but hopefully I'll have more time now that Matt is settled in and Bug is back on a schedule. She loves having her Daddy home!
This is the set that I did yesterday. I made five of each and packaged them in a cute little bag with a ribbon tie. This was my first attempt at watercolor pencils! Can you believe that! I've been wanting to try them out and finally got to open them. Here's what I did...
First I stamped a Hero Arts Clear Designs teapot in brown StazOn ink and punched it out with my large circle punch. (My punch needs sharpening, any tips on how to do that?)
Then I inked the edges pretty heavy with the same ink, and got lighter towards the middle - to do that just ink the edges and start towards the middle with out adding any more ink to the dobber. You can also get a similar effect using different shades of brown ink getting lighter as you work towards the middle. 

And these are two more sets... same design, different stamps. Have a wonderful night!
Posted by nap time stamper at 12:44 PM 0 comments
Wednesday, March 25, 2009
The tornado blew the roof off the barn!!
We have had a rainy few days and tonight we actually had a tornado! We weren't home for it, we were stuck at Wal Mart with the lights out, a screaming baby and the slowest checker in the world. Not on my things to do for fun list... But when we finally made it home the barn roof was in the neighbors pasture and the swing and slide set were in three different pieces. Guess what we'll be doing tomorrow... The dogs were not happy with us either. Anyway, with all this rain, I got a little inside time and made another chalk board and a card set. Enjoy!
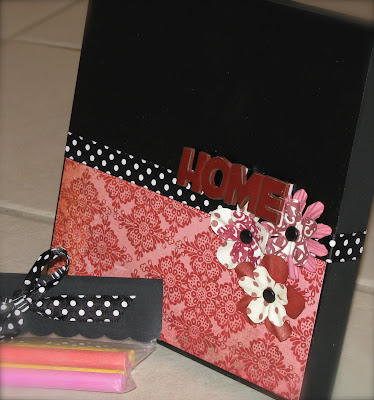
I had a leftover piece of wood stained and sealed from the Christmas projects that I did this year, and thought I'd give that a try at the chalkboard paint. Worked great! Since it was stained and sealed I didn't even bother with the primer, and the chalkboard paint stuck great. I taped off the edges since this block has rounded edges and gave it a few coats. I let it dry for a few hours, although It really didn't need that long, and then peeled the tape off. On this one I wanted to try out this big polka dot ribbon I scored for a dollar the other day, so I picked a blue PP to match. Again, I attached the PP with some good old ModPodge and wrapped the ribbon all the way around the block, In stead of cutting and over lapping it, I ran both sides into a belt buckle and tied a knot in the middle of it. The two ends have a 3D Zot under them to keep them from coming untied. The paper is pretty busy so I just added a few primas and buttons, but looking at it now I think I might add some larger primas and maybe a little bling. It's looking a little boring to me now... For now, here it is!
Posted by nap time stamper at 10:11 PM 1 comments
Make your own Chalk Boards!!
This was such a simple project and it turned out so cute I had to share. Here are the details...
First prime the wood with a black primer, then add a few coats of the spray on "make it chalkboard" paint. This stuff is great! It did bubble a few times and I had to sand it a little and spray it again, but it turned out pretty smooth. The edges soaked up the primer so I added a few extra coats and then painted them with a sponge brush and some black craft paint. That seemed to do the trick.
Attach some scrap PP on the bottom half. I used some valentine scraps of Basic Gray and some good old ModPodge.
Wrap the ribbon all the way around to cover the seam where the paper meets the paint, and over lapped them a little on the side where you plan to embellish.
Then embellish! The "home" embellishment I used is actually a wooden piece that I had in one of my chipboard drawers, but it was out of the package so I have no idea who it's by. If you know, please leave me a comment! :) It's dressed up a little with a few primas and buttons. That's it!
After it was painted and dried, it seriously only took about twenty minutes! I think the hardest part was choosing which primas to use! Hope you enjoy! If you try this one out, please send me a link! I'd love to see it!
Posted by nap time stamper at 9:44 PM 0 comments
Wednesday, March 18, 2009
HUGE Blog Candy!!

Finally back online!! And finally back to scrapping! Can you believe I haven't scrapped or blogged since before Christmas??? We have had a very busy few months, and I won't go into too much detail, but in a nutshell here is what the last few months looked like for me.... My daughter got sick, took her to the Dr. and she had strep and another bug.... about 5 days later she had gotten worse so I called the Dr. and took her back in, she had RSV.... meanwhile she had been vomiting for weeks.... still didn't get better, vomiting got worse so I took her to the ER, they said she was anemic and would need to run tests to see what was causing the vomiting and coughing but it was already 5 am so they sent us home and told me to call the Dr. in the morning and let them do the tests.... called the Dr. and he said go straight to TX. Children's..... about 8 hrs in the waiting room and they saw us... they thought she just had a bug and needed iron because she hadn't vomited since we had been there and her fever was gone.... we had to fight to get her admitted so they sent us to an overnight observation room and ran tests.... she ended up having whooping cough which still didn't explain the vomiting and the anemia.... they admitted her for 5 days (the worst hospital experience I have EVER had by the way) gave us antibiotics and sent us home, still vomiting.... We are seeing a new Dr. now and she is incredible!! She thinks that the vomiting is an intolerance to something we are eating and wasn't related at all to her illnesses, so we are changing up our diets and things are looking much better. While we were at the hospital Red Cross put a call in to my hubby's unit in Afghanistan to let them know what was going on and they sent him home early!!! He didn't get here until two days after we were discharged, but at least she has her daddy home now.
So enough about that, I'm back and I have some projects to share as soon as I can get pics of them! For now, check out this HUGE blog candy!
You have to go visit Sassy Designs by Suzie at Die Cut Dreams!!! Wow! She has one of the biggest blog candies I have ever seen! You can visit her here.
Posted by nap time stamper at 11:05 PM 0 comments


